Build a Work pipeline, connect its form, and run a safe test before real requests arrive.
A pipeline is the recipe for one kind of job. You build it once, and every request that comes through it becomes a Work Item with its own agent.This guide takes you from nothing to a tested pipeline. Plan for about 30 minutes. Most of that time goes into the goal.
Before you start
Make sure you have:
Work turned on. You see Work in the Z360 sidebar. If you see Leads instead, your organization uses Inquiries, the legacy system. See Coming from Inquiries.
At least one sending channel. A connected email address (Settings → Emails) or a phone number (Settings → Phone → Manage). The agent can only contact people from channels you own.
A job in mind. Pick one real, repeatable job. Write down who needs to be contacted and what “finished” means. You will need both for the goal.
Build the pipeline
Go to Settings → Pipelines and click Add New. You can also get there from Work → Manage pipelines.The pipeline has seven steps. Save each step to unlock the next one.
1
Basic Info: name, stages, and sources
Give the pipeline a Pipeline Name your team will recognize, such as “Maintenance requests”, and a short description.Add your Stages. These are the milestones a job passes through, in order. Three to five is plenty.Add Sources if requests arrive from more than one place, such as “Website” and “Tenant portal”.
Name stages after what has happened, not what someone should do. “Vendor contacted” tells you more at a glance than “Contact vendor”.
2
Intake Flow: the form
Build the form people fill in to start a job. Ask only for what the agent needs to do the work.A Work form does not need name, email, and phone fields the way a lead form does. If the job is about a property or an order, ask about that. Do include contact details for anyone the agent must reach.
The answer to the first Short Answer field becomes the start of the Work Item’s title, followed by the pipeline name. Put your most recognizable field first. With “Property address” first, a title reads “14 Maple St, Unit 2 | Maintenance requests”.
3
Agent: the rules and the goal
This step decides how the agent behaves. It has four parts:
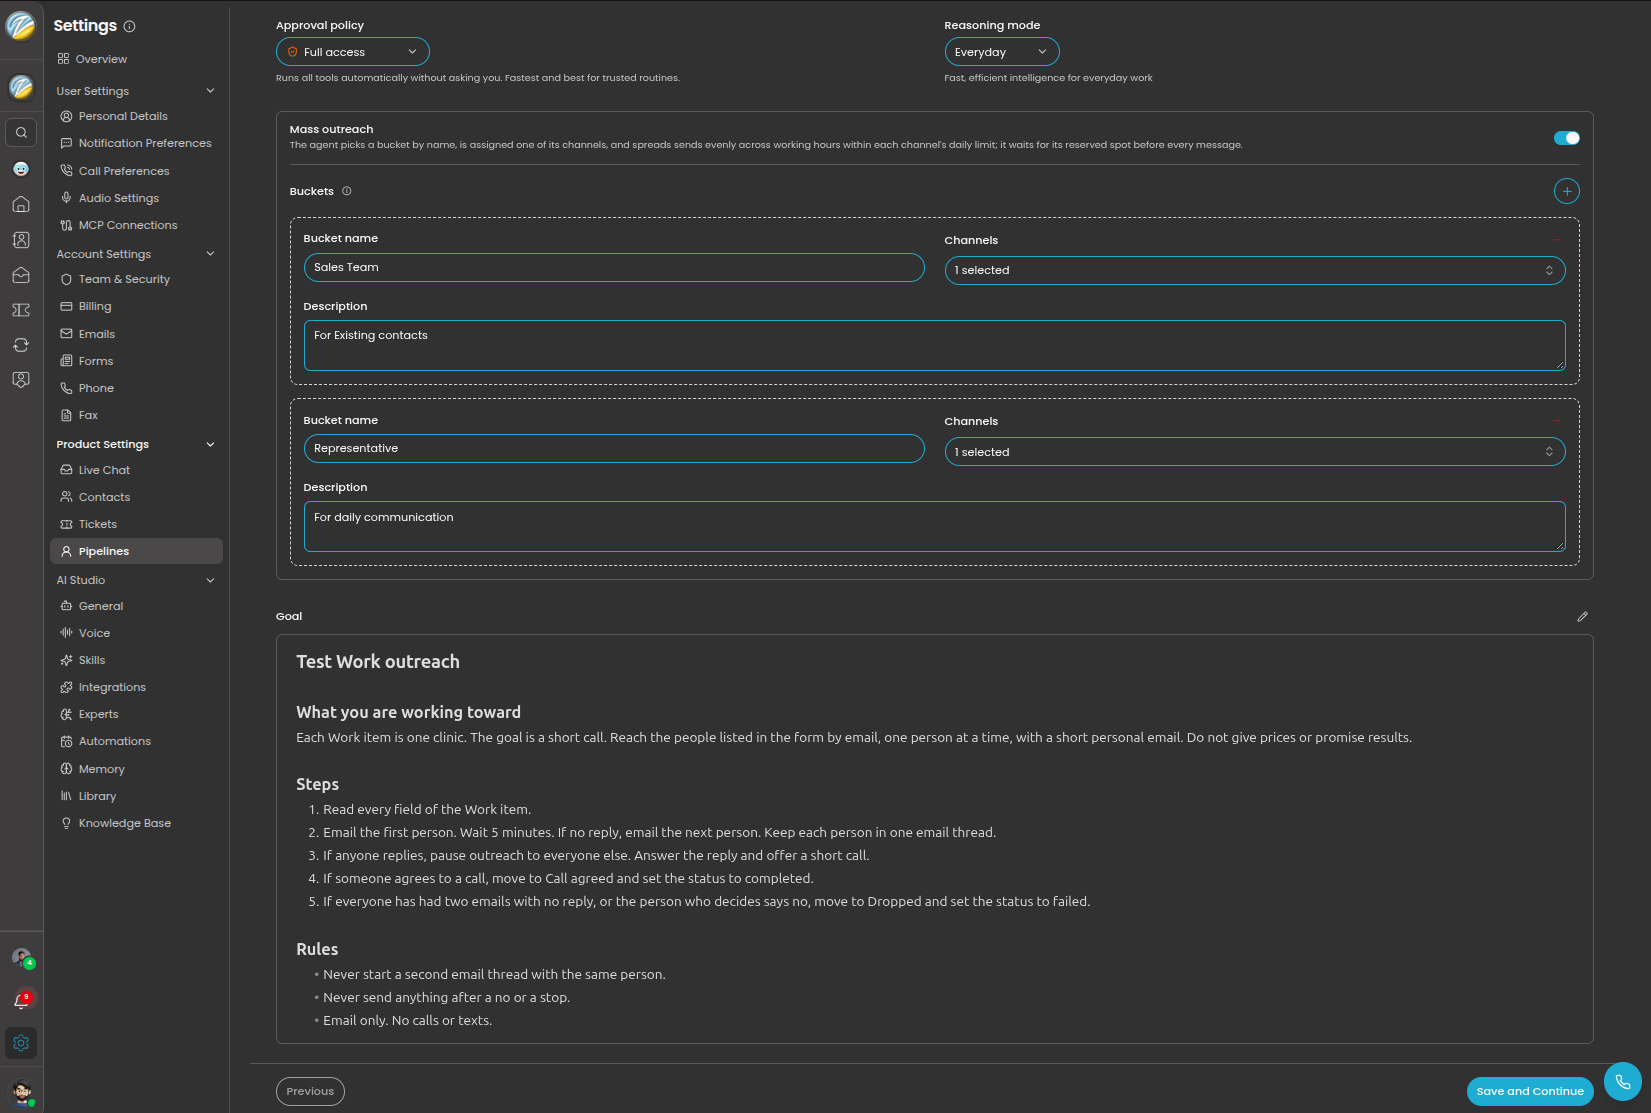
Approval policy — how much the Work agent may do without asking. For your first pipeline, choose Ask for approval so you can watch every move.
Reasoning mode — how capable the AI model is. New pipelines start on Everyday. Choose Advanced when a job needs planning across several people.
Mass outreach — leave this off for now. Turn it on later if you expect large batches. See Mass outreach.
Goal — your instructions to the agent, in plain language.
The Agent step. In this example Mass outreach is switched on, with two buckets.
4
Schedule: working hours
Set the Weekly Availability for this pipeline. The agent times its outreach inside these hours, so nobody gets a follow-up at 2 AM. See Working hours.
5
Branding: how the form looks
Set the header text, button text, and colors so the form matches your brand.
6
Configurations: defaults for new Work Items
Choose what every new Work Item starts with:
Default Assignee(s) — the teammates who own new Work Items. They get a notification for each one.
Default Stage — where new Work Items start. This is usually your first stage.
Default Source — used when a request does not say where it came from.
You can also turn on a consent checkbox and choose what people see after they submit: a thank-you message or a redirect to your website.
Pipeline Outbound Call Limit, Cost Per Lead, and Value Per Secured Lead are used by lead pipelines. They do not change how a Work pipeline runs today, so you can leave them as they are.
7
Integration: connect the form
Your pipeline is ready. Choose how requests will reach it:
Direct Link — a page you can share in an email, a text, or a QR code.
Embed Code — paste it into your website to show the form there.
API / Webhook — let another tool send requests straight to the pipeline.
Run one test with yourself as the customer. It takes five minutes and shows you what your customers and your team will see.
1
Submit the form yourself
Open the Direct Link. Fill in the form with your own phone number or email address as the contact, then submit.
2
Find the Work Item
Open Work and look in All Work. For a few seconds your test may show Agent thread starting under its title.
3
Open it and watch the agent
Click the title. The agent’s chat opens with the Work Summary panel beside it. With Ask for approval on, the agent asks before each action. Read what it plans to do, then approve.
4
Play the customer
When the message reaches your phone or email, reply the way a real customer would. Then try not replying, and check that the follow-up arrives when your goal says it should.
5
Check the result
Did the stage move when you expected? Did the agent stop and ask where the goal says to ask? If something is off, fix the goal and run the test again.
What to check after the test
The Work Item title is easy to recognize in a list.
The first message sounds like your business.
Messages came from the email address or phone number you expected.
Each stage changed at the right moment.
The agent status ended as Completed or Failed, not stuck on In progress.
When the test runs the way you want, share the link or embed the form. Once you trust the pipeline, consider moving the approval policy to Auto.
Tips
Start with one pipeline for one job. A pipeline that tries to cover three different jobs needs a goal nobody can follow, including the agent.
Copy what works. To build a similar pipeline, open the menu on a pipeline’s row in Settings → Pipelines and duplicate it.
Pause without deleting. Switch off Active Status in the pipeline list to stop the form from accepting new requests.
Let Ask Z help. Ask Z can create and update pipelines for you. Describe the job and it will ask what it needs to know.
Re-test after every goal change. A small wording change can alter what the agent does.
⌘I
{"docsConfig":{"theme":"almond","$schema":"https://mintlify.com/docs.json","name":"Z360 Help Center","colors":{"primary":"#1facd3","light":"#1facd3","dark":"#1facd3"},"logo":{"light":"https://mintcdn.com/z360-fe526747/STRSD4GpEK2y2ZJ6/images/Logo-new-01-1-2.webp?fit=max\u0026auto=format\u0026n=STRSD4GpEK2y2ZJ6\u0026q=85\u0026s=4cc2c1f0e0144b92a46dfe4df55ddf98","dark":"https://mintcdn.com/z360-fe526747/STRSD4GpEK2y2ZJ6/images/Logo-new-01-1-2.webp?fit=max\u0026auto=format\u0026n=STRSD4GpEK2y2ZJ6\u0026q=85\u0026s=4cc2c1f0e0144b92a46dfe4df55ddf98"},"favicon":"https://mintcdn.com/z360-fe526747/zkR972frJMMHKGOf/images/Z360Logo.png?fit=max\u0026auto=format\u0026n=zkR972frJMMHKGOf\u0026q=85\u0026s=254a0715b4bd635c9de77bdd54d68d89","navbar":{"links":[{"href":"mailto:help@z360.biz","label":"Support"},{"href":"https://z360.biz","label":"Visit Z360.Biz"},{"href":"https://beta.z360.biz/register","label":"Get Started"}],"primary":{"type":"button","label":"Dashboard","href":"https://dashboard.mintlify.com"}},"footer":{"socials":{"x":"https://x.com/z360_biz","linkedin":"https://www.linkedin.com/company/z360","instagram":"https://www.instagram.com/z360.biz","facebook":"https://www.facebook.com/z360.biz","youtube":"https://www.youtube.com/@Z360_BIZ","website":"https://z360.biz/"}},"contextual":{"options":["copy","view","chatgpt","claude","perplexity","mcp","cursor","vscode"],"display":"header"},"styling":{"latex":true},"navigation":{"pages":[]}},"deployment":{"deploymentMetadataValue":{"subdomain":"z360-fe526747","hasAudioNarration":false,"actualSubdomain":"z360-fe526747","customDomains":["docs.z360.biz"],"gitSource":{"type":"github","owner":"z360biz-llc","repo":"docs","deployBranch":"main","contentDirectory":"","isPrivate":true,"mountPath":"","label":""},"entitlements":{},"buildId":"6afad77a64ef06e8fe2e626b","clientVersion":"0.0.4177","searchFilterCounts":[{"language":"default","tag":"Guides","count":98},{"language":"default","tag":"Inbox","count":15},{"language":"default","tag":"AI studio","count":11},{"language":"default","tag":"Settings","count":10},{"language":"default","tag":"Integrations","count":10},{"language":"default","tag":"Working with Ask Z","count":10},{"language":"default","tag":"Work","count":9},{"language":"default","tag":"Getting started with Z360","count":7},{"language":"default","tag":"HIPAA organizations","count":7},{"language":"default","tag":"Inquiries","count":6}]},"assistantConfig":{"enableAskAiButton":false,"enableStarterQuestions":false,"enableAskAiSearchBar":true},"basePath":"","hasChatPermissions":false,"hasWebMcpPermissions":false,"toggles":[{"name":"kill-isr","enabled":true,"variant":{"name":"disabled","enabled":false,"feature_enabled":true},"impressionData":false},{"name":"custom-rbac-roles","enabled":true,"variant":{"name":"disabled","enabled":false,"feature_enabled":true},"impressionData":false},{"name":"agent-mintlify-slack","enabled":true,"variant":{"name":"disabled","enabled":false,"feature_enabled":true},"impressionData":false},{"name":"agent-integrations-settings","enabled":true,"variant":{"name":"disabled","enabled":false,"feature_enabled":true},"impressionData":false},{"name":"rbac-expansion","enabled":true,"variant":{"name":"disabled","enabled":false,"feature_enabled":true},"impressionData":false},{"name":"automations-pr-grouping","enabled":true,"variant":{"name":"disabled","enabled":false,"feature_enabled":true},"impressionData":false},{"name":"custom-prefix","enabled":true,"variant":{"name":"disabled","enabled":false,"feature_enabled":true},"impressionData":false},{"name":"analytics-v7","enabled":true,"variant":{"name":"disabled","enabled":false,"feature_enabled":true},"impressionData":false},{"name":"user-flows-analytics","enabled":true,"variant":{"name":"disabled","enabled":false,"feature_enabled":true},"impressionData":false},{"name":"no-publish-flow","enabled":true,"variant":{"name":"disabled","enabled":false,"feature_enabled":true},"impressionData":false},{"name":"workos-onboarding","enabled":true,"variant":{"name":"disabled","enabled":false,"feature_enabled":true},"impressionData":false},{"name":"snapshot-serving-live","enabled":true,"variant":{"name":"disabled","enabled":false,"feature_enabled":true},"impressionData":false},{"name":"stripTemperatureMiddleware","enabled":true,"variant":{"name":"disabled","enabled":false,"feature_enabled":true},"impressionData":false},{"name":"support-platform-pylon-zendesk","enabled":true,"variant":{"name":"disabled","enabled":false,"feature_enabled":true},"impressionData":false},{"name":"snapshot-serving","enabled":true,"variant":{"name":"disabled","enabled":false,"feature_enabled":true},"impressionData":false},{"name":"instant-rollback","enabled":true,"variant":{"name":"disabled","enabled":false,"feature_enabled":true},"impressionData":false},{"name":"granular-notifications-server","enabled":true,"variant":{"name":"disabled","enabled":false,"feature_enabled":true},"impressionData":false},{"name":"granular-notifications","enabled":true,"variant":{"name":"disabled","enabled":false,"feature_enabled":true},"impressionData":false},{"name":"automations-fable","enabled":true,"variant":{"name":"disabled","enabled":false,"feature_enabled":true},"impressionData":false},{"name":"fixed-ai-action-pricing","enabled":true,"variant":{"name":"disabled","enabled":false,"feature_enabled":true},"impressionData":false},{"name":"automation-resolve-merge-conflict","enabled":true,"variant":{"name":"disabled","enabled":false,"feature_enabled":true},"impressionData":false},{"name":"scoped-publishing","enabled":true,"variant":{"name":"disabled","enabled":false,"feature_enabled":true},"impressionData":false},{"name":"mintql","enabled":true,"variant":{"name":"disabled","enabled":false,"feature_enabled":true},"impressionData":false},{"name":"page-level-analytics","enabled":true,"variant":{"name":"disabled","enabled":false,"feature_enabled":true},"impressionData":false},{"name":"editor-version-history-v2","enabled":true,"variant":{"name":"disabled","enabled":false,"feature_enabled":true},"impressionData":false},{"name":"billing-page-v2","enabled":true,"variant":{"name":"disabled","enabled":false,"feature_enabled":true},"impressionData":false},{"name":"full-page-search","enabled":true,"variant":{"name":"disabled","enabled":false,"feature_enabled":true},"impressionData":false},{"name":"workspace-projects","enabled":true,"variant":{"name":"disabled","enabled":false,"feature_enabled":true},"impressionData":false},{"name":"assistant-v5","enabled":true,"variant":{"name":"disabled","enabled":false,"feature_enabled":true},"impressionData":false},{"name":"fork-pr-previews","enabled":true,"variant":{"name":"disabled","enabled":false,"feature_enabled":true},"impressionData":false},{"name":"revalidation-jwt","enabled":true,"variant":{"name":"disabled","enabled":false,"feature_enabled":true},"impressionData":false},{"name":"workos-sso-scim","enabled":true,"variant":{"name":"disabled","enabled":false,"feature_enabled":true},"impressionData":false},{"name":"hobby-abuse-scan","enabled":true,"variant":{"name":"disabled","enabled":false,"feature_enabled":true},"impressionData":false},{"name":"dashboard-inbox","enabled":true,"variant":{"name":"disabled","enabled":false,"feature_enabled":true},"impressionData":false},{"name":"workos-signup","enabled":true,"variant":{"name":"disabled","enabled":false,"feature_enabled":true},"impressionData":false},{"name":"turbopuffer-dual-write","enabled":true,"variant":{"name":"disabled","enabled":false,"feature_enabled":true},"impressionData":false},{"name":"workos-enabled","enabled":true,"variant":{"name":"disabled","enabled":false,"feature_enabled":true},"impressionData":false},{"name":"approve-review-flow","enabled":true,"variant":{"name":"disabled","enabled":false,"feature_enabled":true},"impressionData":false},{"name":"editor-metadata","enabled":true,"variant":{"name":"disabled","enabled":false,"feature_enabled":true},"impressionData":false},{"name":"sso-setup-deadline-banner","enabled":true,"variant":{"name":"disabled","enabled":false,"feature_enabled":true},"impressionData":false},{"name":"turbopuffer-serve","enabled":true,"variant":{"name":"disabled","enabled":false,"feature_enabled":true},"impressionData":false},{"name":"live-agents","enabled":true,"variant":{"name":"disabled","enabled":false,"feature_enabled":true},"impressionData":false},{"name":"starter-pricing","enabled":true,"variant":{"name":"control","enabled":true,"payload":{"type":"string","value":"control"},"feature_enabled":true},"impressionData":false},{"name":"llms-txt-v2","enabled":true,"variant":{"name":"disabled","enabled":false,"feature_enabled":true},"impressionData":false}],"googleFontsInlined":true},"customCss":[],"page":{"pagePath":"guides/work/set-up-your-first-work-pipeline","slug":"/guides/work/set-up-your-first-work-pipeline","pageMetadata":{"title":"Set up your first Work pipeline","sidebarTitle":"Set up a Work pipeline","description":"Build a Work pipeline, connect its form, and run a safe test before real requests arrive.","href":"/guides/work/set-up-your-first-work-pipeline"},"description":{"compiledSource":"\"use strict\";\nconst {jsx: _jsx} = arguments[0];\nconst {useMDXComponents: _provideComponents} = arguments[0];\nfunction _createMdxContent(props) {\n const _components = {\n p: \"p\",\n ..._provideComponents(),\n ...props.components\n };\n return _jsx(_components.p, {\n children: \"Build a Work pipeline, connect its form, and run a safe test before real requests arrive.\"\n });\n}\nfunction MDXContent(props = {}) {\n const {wrapper: MDXLayout} = {\n ..._provideComponents(),\n ...props.components\n };\n return MDXLayout ? _jsx(MDXLayout, {\n ...props,\n children: _jsx(_createMdxContent, {\n ...props\n })\n }) : _createMdxContent(props);\n}\nreturn {\n default: MDXContent\n};\n","frontmatter":{},"scope":{}},"pageType":"default","mdx":{"mdxSource":{"compiledSource":"\"use strict\";const{Fragment:_Fragment,jsx:_jsx,jsxs:_jsxs}=arguments[0];const{useMDXComponents:_provideComponents}=arguments[0];function _createMdxContent(props){const _components={a:`a`,li:`li`,p:`p`,strong:`strong`,ul:`ul`,..._provideComponents(),...props.components},{Frame,Heading,Note,OptimizedImage,Step,Steps,Tip}=_components;if(!Frame)_missingMdxReference(`Frame`,true);if(!Heading)_missingMdxReference(`Heading`,true);if(!Note)_missingMdxReference(`Note`,true);if(!OptimizedImage)_missingMdxReference(`OptimizedImage`,true);if(!Step)_missingMdxReference(`Step`,true);if(!Steps)_missingMdxReference(`Steps`,true);if(!Tip)_missingMdxReference(`Tip`,true);return _jsxs(_Fragment,{children:[_jsxs(_components.p,{children:[`A `,_jsx(_components.strong,{children:`pipeline`}),` is the recipe for one kind of job. You build it once, and every request that comes through it becomes a Work Item with its own agent.`]}),`\n`,_jsx(_components.p,{children:`This guide takes you from nothing to a tested pipeline. Plan for about 30 minutes. Most of that time goes into the goal.`}),`\n`,_jsx(Heading,{level:`2`,id:`before-you-start`,children:`Before you start`}),`\n`,_jsx(_components.p,{children:`Make sure you have:`}),`\n`,_jsxs(_components.ul,{children:[`\n`,_jsxs(_components.li,{children:[_jsx(_components.strong,{children:`Work turned on.`}),` You see `,_jsx(_components.strong,{children:`Work`}),` in the Z360 sidebar. If you see `,_jsx(_components.strong,{children:`Leads`}),` instead, your organization uses Inquiries, the legacy system. See `,_jsx(_components.a,{href:`/guides/work/frequently-asked-questions#coming-from-inquiries`,children:`Coming from Inquiries`}),`.`]}),`\n`,_jsxs(_components.li,{children:[_jsx(_components.strong,{children:`At least one sending channel.`}),` A connected email address (`,_jsx(_components.strong,{children:`Settings → Emails`}),`) or a phone number (`,_jsx(_components.strong,{children:`Settings → Phone → Manage`}),`). The agent can only contact people from channels you own.`]}),`\n`,_jsxs(_components.li,{children:[_jsx(_components.strong,{children:`Wallet balance.`}),` The agent’s AI usage is billed to your wallet. See `,_jsx(_components.a,{href:`/guides/settings/manage-prepaid-wallet-usage-controls-and-statements`,children:`Manage your prepaid wallet`}),`.`]}),`\n`,_jsxs(_components.li,{children:[_jsx(_components.strong,{children:`A job in mind.`}),` Pick one real, repeatable job. Write down who needs to be contacted and what “finished” means. You will need both for the goal.`]}),`\n`]}),`\n`,_jsx(Heading,{level:`2`,id:`build-the-pipeline`,children:`Build the pipeline`}),`\n`,_jsxs(_components.p,{children:[`Go to `,_jsx(_components.strong,{children:`Settings → Pipelines`}),` and click `,_jsx(_components.strong,{children:`Add New`}),`. You can also get there from `,_jsx(_components.strong,{children:`Work → Manage pipelines`}),`.`]}),`\n`,_jsx(_components.p,{children:`The pipeline has seven steps. Save each step to unlock the next one.`}),`\n`,_jsxs(Steps,{children:[_jsxs(Step,{title:`Basic Info: name, stages, and sources`,children:[_jsxs(_components.p,{children:[`Give the pipeline a `,_jsx(_components.strong,{children:`Pipeline Name`}),` your team will recognize, such as “Maintenance requests”, and a short description.`]}),_jsxs(_components.p,{children:[`Add your `,_jsx(_components.strong,{children:`Stages`}),`. These are the milestones a job passes through, in order. Three to five is plenty.`]}),_jsxs(_components.p,{children:[`Add `,_jsx(_components.strong,{children:`Sources`}),` if requests arrive from more than one place, such as “Website” and “Tenant portal”.`]}),_jsx(Tip,{children:_jsx(_components.p,{children:`Name stages after what has happened, not what someone should do. “Vendor contacted” tells you more at a glance than “Contact vendor”.`})})]}),_jsxs(Step,{title:`Intake Flow: the form`,children:[_jsx(_components.p,{children:`Build the form people fill in to start a job. Ask only for what the agent needs to do the work.`}),_jsx(_components.p,{children:`A Work form does not need name, email, and phone fields the way a lead form does. If the job is about a property or an order, ask about that. Do include contact details for anyone the agent must reach.`}),_jsx(Note,{children:_jsxs(_components.p,{children:[`The answer to the first `,_jsx(_components.strong,{children:`Short Answer`}),` field becomes the start of the Work Item’s title, followed by the pipeline name. Put your most recognizable field first. With “Property address” first, a title reads “14 Maple St, Unit 2 | Maintenance requests”.`]})})]}),_jsxs(Step,{title:`Agent: the rules and the goal`,children:[_jsx(_components.p,{children:`This step decides how the agent behaves. It has four parts:`}),_jsxs(_components.ul,{children:[`\n`,_jsxs(_components.li,{children:[_jsx(_components.strong,{children:_jsx(_components.a,{href:`/guides/working-with-ask-z/approvals-and-reasoning#approval-policy`,children:`Approval policy`})}),` — how much the Work agent may do without asking. For your first pipeline, choose `,_jsx(_components.strong,{children:`Ask for approval`}),` so you can watch every move.`]}),`\n`,_jsxs(_components.li,{children:[_jsx(_components.strong,{children:_jsx(_components.a,{href:`/guides/working-with-ask-z/approvals-and-reasoning#intelligence`,children:`Reasoning mode`})}),` — how capable the AI model is. New pipelines start on `,_jsx(_components.strong,{children:`Everyday`}),`. Choose `,_jsx(_components.strong,{children:`Advanced`}),` when a job needs planning across several people.`]}),`\n`,_jsxs(_components.li,{children:[_jsx(_components.strong,{children:`Mass outreach`}),` — leave this off for now. Turn it on later if you expect large batches. See `,_jsx(_components.a,{href:`/guides/work/mass-outreach`,children:`Mass outreach`}),`.`]}),`\n`,_jsxs(_components.li,{children:[_jsx(_components.strong,{children:`Goal`}),` — your instructions to the agent, in plain language.`]}),`\n`]}),_jsxs(_components.p,{children:[`The goal is the part that matters most. Take your time with it, and follow `,_jsx(_components.a,{href:`/guides/work/write-a-pipeline-goal`,children:`Write a goal the agent can follow`}),`.`]}),_jsxs(_components.p,{children:[`For the Work-specific controls, such as changing the rules for one Work Item, see `,_jsx(_components.a,{href:`/guides/work/approvals-and-control`,children:`Approvals and control`}),`.`]}),_jsx(Frame,{caption:`The Agent step. In this example Mass outreach is switched on, with two buckets.`,children:_jsx(OptimizedImage,{src:`https://mintcdn.com/z360-fe526747/sOi4qySNiv1nnWzq/images/work/pipeline-agent-step.png?fit=max\u0026auto=format\u0026n=sOi4qySNiv1nnWzq\u0026q=85\u0026s=c8010be8a65a252cfcc3d5a459a28fcd`,alt:`The Agent step of a pipeline. Approval policy and Reasoning mode selectors are at the top. Below them, the Mass outreach switch is on and two buckets are listed, each with a bucket name, a channels selector, and a description. The Goal box is at the bottom with a pencil icon on its right.`,\"data-og-width\":`1651`,width:`1651`,\"data-og-height\":`1113`,height:`1113`,\"data-path\":`images/work/pipeline-agent-step.png`,\"data-optimize\":`true`,\"data-opv\":`3`,srcset:`https://mintcdn.com/z360-fe526747/sOi4qySNiv1nnWzq/images/work/pipeline-agent-step.png?w=280\u0026fit=max\u0026auto=format\u0026n=sOi4qySNiv1nnWzq\u0026q=85\u0026s=67332ff607081b53bb255dac157264ef 280w, https://mintcdn.com/z360-fe526747/sOi4qySNiv1nnWzq/images/work/pipeline-agent-step.png?w=560\u0026fit=max\u0026auto=format\u0026n=sOi4qySNiv1nnWzq\u0026q=85\u0026s=3ac0c85f648a969b2c80acdb127d47f7 560w, https://mintcdn.com/z360-fe526747/sOi4qySNiv1nnWzq/images/work/pipeline-agent-step.png?w=840\u0026fit=max\u0026auto=format\u0026n=sOi4qySNiv1nnWzq\u0026q=85\u0026s=0ce56a97885489b14eb2efdb1e427a27 840w, https://mintcdn.com/z360-fe526747/sOi4qySNiv1nnWzq/images/work/pipeline-agent-step.png?w=1100\u0026fit=max\u0026auto=format\u0026n=sOi4qySNiv1nnWzq\u0026q=85\u0026s=6966e791d7ffcad3e17e9c302d9cba51 1100w, https://mintcdn.com/z360-fe526747/sOi4qySNiv1nnWzq/images/work/pipeline-agent-step.png?w=1650\u0026fit=max\u0026auto=format\u0026n=sOi4qySNiv1nnWzq\u0026q=85\u0026s=a7314a4ab8385f4a661dd7fbf6d00561 1650w, https://mintcdn.com/z360-fe526747/sOi4qySNiv1nnWzq/images/work/pipeline-agent-step.png?w=2500\u0026fit=max\u0026auto=format\u0026n=sOi4qySNiv1nnWzq\u0026q=85\u0026s=0cb3b2493e64c5e50a0e509476bd68ee 2500w`})})]}),_jsx(Step,{title:`Schedule: working hours`,children:_jsxs(_components.p,{children:[`Set the `,_jsx(_components.strong,{children:`Weekly Availability`}),` for this pipeline. The agent times its outreach inside these hours, so nobody gets a follow-up at 2 AM. See `,_jsx(_components.a,{href:`/guides/work/approvals-and-control#working-hours`,children:`Working hours`}),`.`]})}),_jsx(Step,{title:`Branding: how the form looks`,children:_jsx(_components.p,{children:`Set the header text, button text, and colors so the form matches your brand.`})}),_jsxs(Step,{title:`Configurations: defaults for new Work Items`,children:[_jsx(_components.p,{children:`Choose what every new Work Item starts with:`}),_jsxs(_components.ul,{children:[`\n`,_jsxs(_components.li,{children:[_jsx(_components.strong,{children:`Default Assignee(s)`}),` — the teammates who own new Work Items. They get a notification for each one.`]}),`\n`,_jsxs(_components.li,{children:[_jsx(_components.strong,{children:`Default Stage`}),` — where new Work Items start. This is usually your first stage.`]}),`\n`,_jsxs(_components.li,{children:[_jsx(_components.strong,{children:`Default Source`}),` — used when a request does not say where it came from.`]}),`\n`]}),_jsx(_components.p,{children:`You can also turn on a consent checkbox and choose what people see after they submit: a thank-you message or a redirect to your website.`}),_jsx(Note,{children:_jsxs(_components.p,{children:[_jsx(_components.strong,{children:`Pipeline Outbound Call Limit`}),`, `,_jsx(_components.strong,{children:`Cost Per Lead`}),`, and `,_jsx(_components.strong,{children:`Value Per Secured Lead`}),` are used by lead pipelines. They do not change how a Work pipeline runs today, so you can leave them as they are.`]})})]}),_jsxs(Step,{title:`Integration: connect the form`,children:[_jsx(_components.p,{children:`Your pipeline is ready. Choose how requests will reach it:`}),_jsxs(_components.ul,{children:[`\n`,_jsxs(_components.li,{children:[_jsx(_components.strong,{children:`Direct Link`}),` — a page you can share in an email, a text, or a QR code.`]}),`\n`,_jsxs(_components.li,{children:[_jsx(_components.strong,{children:`Embed Code`}),` — paste it into your website to show the form there.`]}),`\n`,_jsxs(_components.li,{children:[_jsx(_components.strong,{children:`API / Webhook`}),` — let another tool send requests straight to the pipeline.`]}),`\n`]}),_jsxs(_components.p,{children:[`For more on sharing forms, see `,_jsx(_components.a,{href:`/share-z360-forms-via-direct-link-and-embed-code`,children:`Share Z360 forms via direct link and embed code`}),`.`]})]})]}),`\n`,_jsx(Heading,{level:`2`,id:`test-it-before-you-share-it`,children:`Test it before you share it`}),`\n`,_jsx(_components.p,{children:`Run one test with yourself as the customer. It takes five minutes and shows you what your customers and your team will see.`}),`\n`,_jsxs(Steps,{children:[_jsx(Step,{title:`Submit the form yourself`,children:_jsxs(_components.p,{children:[`Open the `,_jsx(_components.strong,{children:`Direct Link`}),`. Fill in the form with your own phone number or email address as the contact, then submit.`]})}),_jsx(Step,{title:`Find the Work Item`,children:_jsxs(_components.p,{children:[`Open `,_jsx(_components.strong,{children:`Work`}),` and look in `,_jsx(_components.strong,{children:`All Work`}),`. For a few seconds your test may show `,_jsx(_components.strong,{children:`Agent thread starting`}),` under its title.`]})}),_jsx(Step,{title:`Open it and watch the agent`,children:_jsxs(_components.p,{children:[`Click the title. The agent’s chat opens with the `,_jsx(_components.strong,{children:`Work Summary`}),` panel beside it. With `,_jsx(_components.strong,{children:`Ask for approval`}),` on, the agent asks before each action. Read what it plans to do, then approve.`]})}),_jsx(Step,{title:`Play the customer`,children:_jsx(_components.p,{children:`When the message reaches your phone or email, reply the way a real customer would. Then try not replying, and check that the follow-up arrives when your goal says it should.`})}),_jsx(Step,{title:`Check the result`,children:_jsx(_components.p,{children:`Did the stage move when you expected? Did the agent stop and ask where the goal says to ask? If something is off, fix the goal and run the test again.`})})]}),`\n`,_jsx(Heading,{level:`3`,id:`what-to-check-after-the-test`,children:`What to check after the test`}),`\n`,_jsxs(_components.ul,{children:[`\n`,_jsx(_components.li,{children:`The Work Item title is easy to recognize in a list.`}),`\n`,_jsx(_components.li,{children:`The first message sounds like your business.`}),`\n`,_jsx(_components.li,{children:`Messages came from the email address or phone number you expected.`}),`\n`,_jsx(_components.li,{children:`Each stage changed at the right moment.`}),`\n`,_jsxs(_components.li,{children:[`The agent status ended as `,_jsx(_components.strong,{children:`Completed`}),` or `,_jsx(_components.strong,{children:`Failed`}),`, not stuck on `,_jsx(_components.strong,{children:`In progress`}),`.`]}),`\n`]}),`\n`,_jsxs(_components.p,{children:[`When the test runs the way you want, share the link or embed the form. Once you trust the pipeline, consider moving the approval policy to `,_jsx(_components.strong,{children:`Auto`}),`.`]}),`\n`,_jsx(Heading,{level:`2`,id:`tips`,children:`Tips`}),`\n`,_jsxs(_components.ul,{children:[`\n`,_jsxs(_components.li,{children:[_jsx(_components.strong,{children:`Start with one pipeline for one job.`}),` A pipeline that tries to cover three different jobs needs a goal nobody can follow, including the agent.`]}),`\n`,_jsxs(_components.li,{children:[_jsx(_components.strong,{children:`Copy what works.`}),` To build a similar pipeline, open the menu on a pipeline’s row in `,_jsx(_components.strong,{children:`Settings → Pipelines`}),` and duplicate it.`]}),`\n`,_jsxs(_components.li,{children:[_jsx(_components.strong,{children:`Pause without deleting.`}),` Switch off `,_jsx(_components.strong,{children:`Active Status`}),` in the pipeline list to stop the form from accepting new requests.`]}),`\n`,_jsxs(_components.li,{children:[_jsx(_components.strong,{children:`Let Ask Z help.`}),` Ask Z can create and update pipelines for you. Describe the job and it will ask what it needs to know.`]}),`\n`,_jsxs(_components.li,{children:[_jsx(_components.strong,{children:`Re-test after every goal change.`}),` A small wording change can alter what the agent does.`]}),`\n`]})]})}function MDXContent(props={}){const{wrapper:MDXLayout}={..._provideComponents(),...props.components};return MDXLayout?_jsx(MDXLayout,{...props,children:_jsx(_createMdxContent,{...props})}):_createMdxContent(props)}return{default:MDXContent};function _missingMdxReference(id,component){throw new Error(`Expected `+(component?`component`:`object`)+\" `\"+id+\"` to be defined: you likely forgot to import, pass, or provide it.\")}","frontmatter":{},"scope":{"config":{},"pageMetadata":{"title":"Set up your first Work pipeline","sidebarTitle":"Set up a Work pipeline","description":"Build a Work pipeline, connect its form, and run a safe test before real requests arrive.","href":"/guides/work/set-up-your-first-work-pipeline"}}},"mdxSourceWithNoJs":null},"mdxExtracts":{"tableOfContents":[{"title":"Before you start","slug":"before-you-start","depth":2,"children":[]},{"title":"Build the pipeline","slug":"build-the-pipeline","depth":2,"children":[]},{"title":"Test it before you share it","slug":"test-it-before-you-share-it","depth":2,"children":[{"title":"What to check after the test","slug":"what-to-check-after-the-test","depth":3,"children":[]}]},{"title":"Tips","slug":"tips","depth":2,"children":[]}],"codeExamples":{}},"jsLinks":[],"subdomain":"z360-fe526747","siteName":"Z360 Help Center","title":"Set up your first Work pipeline - Z360 Help Center","navMaps":{"firstHrefInVersion":{},"firstHrefInLanguage":{}},"lastModified":"2026-11-13T17:15:06.932Z","originalFileLocation":"guides/work/set-up-your-first-work-pipeline.mdx"},"headHtml":"\u003cscript data-mint-head>(function(){var d=document.documentElement,p=null;if(!p){try{p=localStorage.getItem(\"isDarkMode\")}catch(e){}if(p==='true')p='dark';else if(p==='false')p='light';if(p!=='light'\u0026\u0026p!=='dark'\u0026\u0026p!=='system')p=\"system\"}var r=p==='system'?(matchMedia(\"(prefers-color-scheme: dark)\").matches?'dark':'light'):p;d.classList.remove(r==='dark'?'light':'dark');d.classList.add(r);d.setAttribute(\"data-theme-preference\",p)})();\u003c/script>\u003cmeta data-mint-head name=\"description\" content=\"Build a Work pipeline, connect its form, and run a safe test before real requests arrive.\">\u003cmeta data-mint-head name=\"application-name\" content=\"Z360 Help Center\">\u003cmeta data-mint-head name=\"generator\" content=\"Mintlify\">\u003clink data-mint-head rel=\"icon\" type=\"image/png\" sizes=\"192x192\" href=\"/mintlify-assets/_mintlify/favicons/z360-fe526747/NbqIJg2mLFJXgaxk/_generated/favicon/android-chrome-192x192.png\" media=\"(prefers-color-scheme: light)\">\u003clink data-mint-head rel=\"apple-touch-icon\" type=\"image/png\" sizes=\"180x180\" href=\"/mintlify-assets/_mintlify/favicons/z360-fe526747/NbqIJg2mLFJXgaxk/_generated/favicon/apple-touch-icon.png\">\u003clink data-mint-head rel=\"icon\" type=\"image/png\" sizes=\"16x16\" href=\"/mintlify-assets/_mintlify/favicons/z360-fe526747/NbqIJg2mLFJXgaxk/_generated/favicon/favicon-16x16.png\" media=\"(prefers-color-scheme: light)\">\u003clink data-mint-head rel=\"icon\" type=\"image/png\" sizes=\"32x32\" href=\"/mintlify-assets/_mintlify/favicons/z360-fe526747/NbqIJg2mLFJXgaxk/_generated/favicon/favicon-32x32.png\" media=\"(prefers-color-scheme: light)\">\u003clink data-mint-head rel=\"shortcut icon\" type=\"image/x-icon\" href=\"/mintlify-assets/_mintlify/favicons/z360-fe526747/NbqIJg2mLFJXgaxk/_generated/favicon/favicon.ico\" media=\"(prefers-color-scheme: light)\">\u003clink data-mint-head rel=\"icon\" type=\"image/png\" sizes=\"192x192\" href=\"/mintlify-assets/_mintlify/favicons/z360-fe526747/NbqIJg2mLFJXgaxk/_generated/favicon-dark/android-chrome-192x192.png\" media=\"(prefers-color-scheme: dark)\">\u003clink data-mint-head rel=\"icon\" type=\"image/png\" sizes=\"16x16\" href=\"/mintlify-assets/_mintlify/favicons/z360-fe526747/NbqIJg2mLFJXgaxk/_generated/favicon-dark/favicon-16x16.png\" media=\"(prefers-color-scheme: dark)\">\u003clink data-mint-head rel=\"icon\" type=\"image/png\" sizes=\"32x32\" href=\"/mintlify-assets/_mintlify/favicons/z360-fe526747/NbqIJg2mLFJXgaxk/_generated/favicon-dark/favicon-32x32.png\" media=\"(prefers-color-scheme: dark)\">\u003clink data-mint-head rel=\"shortcut icon\" type=\"image/x-icon\" href=\"/mintlify-assets/_mintlify/favicons/z360-fe526747/NbqIJg2mLFJXgaxk/_generated/favicon-dark/favicon.ico\" media=\"(prefers-color-scheme: dark)\">\u003cmeta data-mint-head property=\"og:title\" content=\"Set up your first Work pipeline - Z360 Help Center\">\u003cmeta data-mint-head property=\"og:description\" content=\"Build a Work pipeline, connect its form, and run a safe test before real requests arrive.\">\u003cmeta data-mint-head property=\"og:site_name\" content=\"Z360 Help Center\">\u003cmeta data-mint-head property=\"og:url\" content=\"https://docs.z360.biz/guides/work/set-up-your-first-work-pipeline\">\u003cmeta data-mint-head property=\"og:type\" content=\"website\">\u003cmeta data-mint-head property=\"og:image\" content=\"https://z360-fe526747.mintlify.site/_mintlify/api/og/v2?division=Work\u0026amp;title=Set+up+your+first+Work+pipeline\u0026amp;description=Build+a+Work+pipeline%2C+connect+its+form%2C+and+run+a+safe+test+before+real+requests+arrive.\u0026amp;theme=46f8b0e7a71c979b4e9706cb\u0026amp;signature=01b8a556a090755860311d5099f6d032dd703e86e0741a36c8fc75981641e6a5\">\u003cmeta data-mint-head property=\"og:image:width\" content=\"1200\">\u003cmeta data-mint-head property=\"og:image:height\" content=\"630\">\u003cmeta data-mint-head name=\"twitter:card\" content=\"summary_large_image\">\u003cmeta data-mint-head name=\"twitter:title\" content=\"Set up your first Work pipeline - Z360 Help Center\">\u003cmeta data-mint-head name=\"twitter:description\" content=\"Build a Work pipeline, connect its form, and run a safe test before real requests arrive.\">\u003cmeta data-mint-head name=\"twitter:image\" content=\"https://z360-fe526747.mintlify.site/_mintlify/api/og/v2?division=Work\u0026amp;title=Set+up+your+first+Work+pipeline\u0026amp;description=Build+a+Work+pipeline%2C+connect+its+form%2C+and+run+a+safe+test+before+real+requests+arrive.\u0026amp;theme=46f8b0e7a71c979b4e9706cb\u0026amp;signature=01b8a556a090755860311d5099f6d032dd703e86e0741a36c8fc75981641e6a5\">\u003cmeta data-mint-head name=\"twitter:image:width\" content=\"1200\">\u003cmeta data-mint-head name=\"twitter:image:height\" content=\"630\">\u003cmeta data-mint-head name=\"msapplication-config\" content=\"/mintlify-assets/_mintlify/favicons/z360-fe526747/NbqIJg2mLFJXgaxk/_generated/favicon/browserconfig.xml\">\u003cmeta data-mint-head name=\"apple-mobile-web-app-title\" content=\"Z360 Help Center\">\u003cmeta data-mint-head name=\"msapplication-TileColor\" content=\"#1facd3\">\u003clink data-mint-head rel=\"canonical\" href=\"https://docs.z360.biz/guides/work/set-up-your-first-work-pipeline\">\u003clink data-mint-head rel=\"alternate\" type=\"application/xml\" href=\"/sitemap.xml\">\u003clink data-mint-head rel=\"alternate\" type=\"text/markdown\" href=\"/guides/work/set-up-your-first-work-pipeline.md\">\u003cscript data-mint-head type=\"application/ld+json\">{\"@context\":\"https://schema.org\",\"@graph\":[{\"@type\":\"Organization\",\"@id\":\"https://docs.z360.biz/#organization\",\"name\":\"Z360 Help Center\",\"url\":\"https://docs.z360.biz\",\"logo\":{\"@type\":\"ImageObject\",\"url\":\"https://mintcdn.com/z360-fe526747/STRSD4GpEK2y2ZJ6/images/Logo-new-01-1-2.webp?fit=max\u0026auto=format\u0026n=STRSD4GpEK2y2ZJ6\u0026q=85\u0026s=4cc2c1f0e0144b92a46dfe4df55ddf98\"}},{\"@type\":\"WebSite\",\"@id\":\"https://docs.z360.biz#website\",\"name\":\"Z360 Help Center\",\"url\":\"https://docs.z360.biz\",\"publisher\":{\"@id\":\"https://docs.z360.biz/#organization\"}},{\"@type\":\"WebPage\",\"@id\":\"https://docs.z360.biz/guides/work/set-up-your-first-work-pipeline#webpage\",\"url\":\"https://docs.z360.biz/guides/work/set-up-your-first-work-pipeline\",\"name\":\"Set up your first Work pipeline\",\"description\":\"Build a Work pipeline, connect its form, and run a safe test before real requests arrive.\",\"dateModified\":\"2026-11-13T17:15:06.932Z\",\"isPartOf\":{\"@id\":\"https://docs.z360.biz#website\"},\"breadcrumb\":{\"@id\":\"https://docs.z360.biz/guides/work/set-up-your-first-work-pipeline#breadcrumb\"}},{\"@type\":\"BreadcrumbList\",\"@id\":\"https://docs.z360.biz/guides/work/set-up-your-first-work-pipeline#breadcrumb\",\"itemListElement\":[{\"@type\":\"ListItem\",\"position\":1,\"name\":\"Work\",\"item\":\"https://docs.z360.biz/guides/work/overview\"},{\"@type\":\"ListItem\",\"position\":2,\"name\":\"Set up your first Work pipeline\",\"item\":\"https://docs.z360.biz/guides/work/set-up-your-first-work-pipeline\"}]},{\"@type\":[\"Article\",\"TechArticle\"],\"@id\":\"https://docs.z360.biz/guides/work/set-up-your-first-work-pipeline#article\",\"headline\":\"Set up your first Work pipeline\",\"name\":\"Set up your first Work pipeline\",\"description\":\"Build a Work pipeline, connect its form, and run a safe test before real requests arrive.\",\"url\":\"https://docs.z360.biz/guides/work/set-up-your-first-work-pipeline\",\"mainEntityOfPage\":{\"@id\":\"https://docs.z360.biz/guides/work/set-up-your-first-work-pipeline#webpage\"},\"dateModified\":\"2026-11-13T17:15:06.932Z\",\"publisher\":{\"@id\":\"https://docs.z360.biz/#organization\"},\"isPartOf\":{\"@id\":\"https://docs.z360.biz#website\"}}]}\u003c/script>\u003cscript data-mint-head type=\"application/ld+json\">{\"@context\":\"https://schema.org\",\"@type\":\"WebSite\",\"name\":\"Z360 Help Center\",\"publisher\":{\"@type\":\"Organization\",\"name\":\"Z360 Help Center\"},\"provider\":{\"@type\":\"Organization\",\"name\":\"Mintlify\",\"url\":\"https://mintlify.com\"}}\u003c/script>","agentPointerHref":"/guides/work/set-up-your-first-work-pipeline.md","siteName":"Z360 Help Center","nav":{"global":null,"tabs":[{"tab":"Guides","groups":[{"group":"Getting started with Z360","pages":[{"title":"Getting Started with Z360 — Your Complete Self-Setup Guide","sidebarTitle":"Z360 Complete Self-Setup Guide","href":"/z360-complete-self-setup-guide"},{"title":"Signup and Login back","sidebarTitle":"Signup and Login back","href":"/Signup-and-Login-back"},{"title":"Setup your organization - Free trial and subscription, Adding team members to your organization, Change organization identity","sidebarTitle":"Organization setup","href":"/Organization-setup"},{"title":"Z360 Mobile Experience","sidebarTitle":"[New] Mobile experience","href":"/guides/getting-started-with-z360/mobile-experience"},{"title":"Use Command Search and Keyboard Shortcuts","sidebarTitle":"Command Search","href":"/guides/getting-started-with-z360/use-command-search-and-keyboard-shortcuts"},{"title":"Frequently Asked Questions","href":"/guides/getting-started-with-z360/frequently-asked-questions"},{"title":"Troubleshooting Guides","href":"/guides/getting-started-with-z360/troubleshooting-guides"}]},{"group":"Working with Ask Z","pages":[{"title":"Working with Ask Z - Z360 assist, MCP tools, web search and third party apps","sidebarTitle":"Working with Ask Z","href":"/Working-with-Ask-Z"},{"title":"Use Intelligent UI","sidebarTitle":"Intelligent UI","href":"/guides/working-with-ask-z/use-intelligent-ui-in-ask-z"},{"title":"Talk to Ask Z in Your Browser","sidebarTitle":"Talk to Ask Z","href":"/guides/working-with-ask-z/talk-to-ask-z-in-your-browser"},{"title":"Use Files, Attachments, and Artifacts in Ask Z","sidebarTitle":"Ask Z Files and Artifacts","href":"/guides/working-with-ask-z/use-files-attachments-and-artifacts-in-ask-z"},{"title":"Create Interactive Dashboards with an Agent","sidebarTitle":"Interactive Dashboards","href":"/guides/working-with-ask-z/create-custom-dashboards-with-ask-z"},{"title":"Ask Z Expert Modes and Previews","sidebarTitle":"Ask Z Expert Modes","href":"/guides/working-with-ask-z/ask-z-expert-modes-and-previews"},{"title":"Make Calls with Your AI Agent","sidebarTitle":"Outbound AI Calls","href":"/guides/working-with-ask-z/make-calls-with-your-ai-agent"},{"title":"Approvals and reasoning","sidebarTitle":"Approvals and reasoning","href":"/guides/working-with-ask-z/approvals-and-reasoning"},{"title":"Frequently Asked Questions","href":"/guides/working-with-ask-z/Frequently-asked-questions"},{"title":"Troubleshooting Guides","href":"/guides/working-with-ask-z/troubleshooting-guides"}]},{"group":"Contacts","pages":[{"title":"Create a New Contact in Z360","sidebarTitle":"Create a New Contact in Z360","href":"/Create-a-New-Contact-in-Z360"},{"title":"Manage contacts in Z360","sidebarTitle":"Manage contacts in Z360","href":"/Manage-contacts-in-z360"},{"title":"Contact Custom Fields and Multiple Contact Methods","sidebarTitle":"Contact Custom Fields","href":"/guides/contacts/contact-custom-fields-and-multiple-contact-methods"},{"title":"Frequently Asked Questions","href":"/guides/contacts/frequently-asked-questions"},{"title":"Troubleshooting Guides","href":"/guides/contacts/troubleshooting-guides"}]},{"group":"Inbox","pages":[{"title":"Create a New Conversation in Z360","sidebarTitle":"Create a New Conversation in Z360","href":"/Creating-new-conversation-in-z360"},{"title":"Adding tickets notes and reminders from Z360 inbox","sidebarTitle":"Adding tickets notes and reminders","href":"/Adding-tickets-notes-and-reminders"},{"title":"Manage Conversations in Z360","sidebarTitle":"Manage Conversations in Z360","href":"/Manage-conversations-in-z360"},{"title":"Use AI Experts in Inbox Conversations","sidebarTitle":"AI Experts in Inbox","href":"/guides/inbox/use-ai-experts-in-inbox-conversations"},{"title":"View Conversation Details in Z360 Inbox","sidebarTitle":"View Conversation Details in Z360","href":"/View-conversation-details-in-z360"},{"title":"DND and Block Contact in Z360","sidebarTitle":"DND and Block Contact in Z360","href":"/DND-and-Block-Contact-in-Z360"},{"title":"Fax in Z360","href":"/guides/inbox/fax-in-z360"},{"title":"Manage Phone Number Routing, Texting, and E-911","sidebarTitle":"Phone Routing and E-911","href":"/guides/inbox/manage-phone-number-routing-texting-and-e911"},{"title":"Warm Call Transfers","sidebarTitle":"Warm Call Transfers","href":"/guides/inbox/warm-call-transfers"},{"title":"Inbox Settings in Z360","sidebarTitle":"Inbox Settings in Z360","href":"/Inbox-settings-in-z360"},{"title":"Setting Up After-Hours Call Forwarding in Vonage","sidebarTitle":"After-Hours Call Forwarding in Vonage","href":"/guides/inbox/setting-up-after-hours-call-forwarding-in-vonage"},{"title":"Setting Up Call Forwarding for a Specific Extension in Vonage","sidebarTitle":"Call Forwarding for a Specific Extension in Vonage","href":"/guides/inbox/setting-up-call-forwarding-for-a-specific-extension-in-vonage"},{"title":"How to Add the Z360 Live Chat Widget to Your Website","sidebarTitle":"Add Z360 Live Chat Widget to Your Website","href":"/add-z360-live-chat-widget-to-your-website"},{"title":"Frequently Asked Questions","href":"/guides/inbox/frequently-asked-questions"},{"title":"Troubleshooting Guides","href":"/guides/inbox/troubleshooting-guides"}]},{"group":"Work","pages":[{"title":"Work in Z360","sidebarTitle":"Overview","href":"/guides/work/overview"},{"title":"How Work operates","sidebarTitle":"How Work operates","description":"The four pieces of Work, the two kinds of AI agents, and one job followed from the first form to the finish.","href":"/guides/work/how-work-works"},{"title":"Set up your first Work pipeline","sidebarTitle":"Set up a Work pipeline","href":"/guides/work/set-up-your-first-work-pipeline"},{"title":"Write a goal the agent can follow","sidebarTitle":"Write a pipeline goal","description":"The goal is your instructions to the Work agent. Learn what to put in it, see a complete example, and avoid the common mistakes.","href":"/guides/work/write-a-pipeline-goal"},{"title":"Manage Work Items in Z360","sidebarTitle":"Manage Work Items","href":"/guides/work/manage-work-items"},{"title":"Approvals and control","sidebarTitle":"Approvals and control","href":"/guides/work/approvals-and-control"},{"title":"Pace large batches with mass outreach","sidebarTitle":"Mass outreach","href":"/guides/work/mass-outreach"},{"title":"Frequently Asked Questions","href":"/guides/work/frequently-asked-questions"},{"title":"Troubleshooting Guides","href":"/guides/work/troubleshooting-guides"}]},{"group":"Tickets","pages":[{"title":"Add a ticket in z360","href":"/Add-a-ticket-in-z360"},{"title":"Manage Tickets in Z360","sidebarTitle":"Manage Tickets in Z360","href":"/Manage-tickets-in-z360"},{"title":"Ticket Settings in Z360","sidebarTitle":"Ticket Settings in Z360","href":"/Tickets-settings-in-z360"},{"title":"Frequently Asked Questions","href":"/guides/tickets/frequently-asked-questions"},{"title":"Troubleshooting Guides","href":"/guides/tickets/troubleshooting-guides"}]},{"group":"Inquiries","tag":"Legacy","pages":[{"title":"Add an Inquiry in Z360","sidebarTitle":"Add an Inquiry in Z360","href":"/Add-an-inquiry-in-z360"},{"title":"Manage Inquiries in Z360","sidebarTitle":"Manage Inquiries in Z360","href":"/Manage-inquiries-in-z360"},{"title":"Create an Inquiry Pipeline in Z360","sidebarTitle":"Create an Inquiry Pipeline in Z360","href":"/Create-an-Inquiry-Pipeline-in-Z360"},{"title":"Pipeline Dashboards and AI Follow-Ups","sidebarTitle":"Pipeline Dashboards and Follow-Ups","href":"/guides/inquiries/pipeline-dashboards-and-ai-follow-ups"},{"title":"Frequently Asked Questions","href":"/guides/inquiries/frequently-asked-questions"},{"title":"Troubleshooting Guides","href":"/guides/inquiries/troubleshooting-guides"}]},{"group":"AI studio","pages":[{"title":"Agent Setup and Schedule Availability in Z360","sidebarTitle":"Agent Setup and Schedule Availability","href":"/Agent-setup-and-schedule-availability"},{"title":"Knowledge Base Setup for Agents in Z360","sidebarTitle":"Knowledge Base Setup for Agents","href":"/Knowledgebase-setup-in-z360"},{"title":"Add and Configure Integrations in Z360","sidebarTitle":"Add and Configure Integrations","href":"/Configure-integrations-in-z360"},{"title":"Create and Automate Custom AI Experts","sidebarTitle":"Custom AI Experts","href":"/guides/ai-studio/create-and-automate-custom-ai-experts"},{"title":"Create and Manage AI Studio Automations","sidebarTitle":"AI Studio Automations","href":"/guides/ai-studio/create-and-manage-ai-studio-automations"},{"title":"Browse and Review AI Skills","sidebarTitle":"AI Skills","href":"/guides/ai-studio/import-and-review-ai-skills"},{"title":"Manage Ask Z Memory","sidebarTitle":"Ask Z Memory","href":"/guides/ai-studio/manage-ask-z-memory"},{"title":"AI insights hub","sidebarTitle":"AI insights hub","href":"/guides/ai-studio/ai-insights-hub"},{"title":"Setup stedi ability","sidebarTitle":"Setup stedi ability","href":"/guides/ai-studio/setup-stedi-ability"},{"title":"Frequently Asked Questions","href":"/guides/ai-studio/frequently-asked-questions"},{"title":"Troubleshooting Guides","href":"/guides/ai-studio/troubleshooting-guides"}]},{"group":"Integrations","pages":[{"title":"Integrations overview","href":"/Integrations-overview"},{"title":"Share Z360 Forms via Direct Link \u0026 Embed Code","href":"/share-z360-forms-via-direct-link-and-embed-code"},{"title":"Connect Z360 Forms with WordPress","href":"/connect-z360-forms-with-word-press"},{"title":"Connect Z360 Forms/Pipelines with WordPress using custom code","href":"/connect-z360-pipelines-with-word-press"},{"title":"Connect Z360 with WordPress using Bit Integrations","href":"/connect-z360-with-word-press-using-bit-integrations"},{"title":"Connect Z360 with Third-Party Forms via Zapier","href":"/connect-z360-with-third-party-forms-via-zapier-1"},{"title":"Connect Z360 with MCP Servers","href":"/connect-z360-with-mcp-servers"},{"title":"Connect Z360 with External Tools Using Custom/API Integrations","href":"/connect-z360-with-external-tools-using-custom-api-integrations"},{"title":"Frequently Asked Questions","href":"/frequently-asked-questions"},{"title":"Troubleshooting Guides","href":"/Troubleshooting-Guides"}]},{"group":"EHR \u0026 practice systems","pages":[{"title":"Connect Your Practice System to Z360","sidebarTitle":"Connect your practice system","href":"/guides/ehr-practice-systems/connect-your-practice-system"},{"title":"What Z360 Can Do with Your Practice System","sidebarTitle":"What Z360 can do","href":"/guides/ehr-practice-systems/what-z360-can-do"},{"title":"Practice System Questions and Answers","sidebarTitle":"Frequently asked questions","href":"/guides/ehr-practice-systems/frequently-asked-questions"},{"title":"Fix a Problem with Your Practice System","sidebarTitle":"Troubleshooting guides","href":"/guides/ehr-practice-systems/troubleshooting-guides"}]},{"group":"Settings","pages":[{"title":"Personal Settings and Notification Preferences in Z360","sidebarTitle":"Configure personal settings in z360","href":"/Configure-personal-settings-in-z360"},{"title":"Billing and Pay-As-You-Go Settings in Z360","sidebarTitle":"Billing and PAYG Settings in Z360","href":"/Billing-settings-in-z360"},{"title":"Manage Prepaid Wallet, Usage Controls, and Statements","sidebarTitle":"Prepaid Wallet and Statements","href":"/guides/settings/manage-prepaid-wallet-usage-controls-and-statements"},{"title":"Connect a Physical Phone to Z360","sidebarTitle":"Connect a Physical Phone","href":"/guides/settings/connect-physical-phone"},{"title":"Review the Organization Audit Log","sidebarTitle":"Review Organization Audit Log","href":"/guides/settings/review-organization-audit-log"},{"title":"Managing Organizations and Customizing Display Settings in Z360","sidebarTitle":"Additional settings in Z360","href":"/Additional-settings-in-z360"},{"title":"How to Register for 10DLC in Z360","href":"/guides/settings/how-to-register-for-10-dlc-in-z360"},{"title":"Port Your Phone Number to Z360","href":"/guides/settings/port-your-phone-number-to-z360"},{"title":"Frequently Asked Questions","href":"/guides/settings/frequently-asked-questions"},{"title":"Troubleshooting Guides","href":"/guides/settings/troubleshooting-guides"}]},{"group":"HIPAA organizations","pages":[{"title":"HIPAA on Z360","href":"/hipaa-organizations/overview"},{"title":"Get and manage your BAA","href":"/hipaa-organizations/get-a-baa"},{"title":"What's covered and what's not","href":"/hipaa-organizations/coverage"},{"title":"Your responsibilities","href":"/hipaa-organizations/shared-responsibility"},{"title":"How we handle your data","href":"/hipaa-organizations/data-handling"},{"title":"Subprocessors","href":"/hipaa-organizations/subprocessors"},{"title":"HIPAA FAQ","href":"/hipaa-organizations/faq"}]}]},{"tab":"Changelog","pages":[{"title":"Changelog","href":"/changelog/z360-versions-1"}]}]},"basePath":"","title":"Set up your first Work pipeline - Z360 Help Center","deploymentId":"dpl_HhUetB7eHHDAmK9T1Teip38TgFx9","buildId":"dpl_HhUetB7eHHDAmK9T1Teip38TgFx9","dynamics":["07c022d89b","a74be98ba7"],"chunks":["Frame-DevImLcx.js","DynamicMarkdown-BGHukeRM.js","zoom-image-lightbox-DQG3o8Eu.js","lightbox-handle-r17bVUz3.js"]}